Instructions
INFORMED CONSENT
It is recommended before you start any dental procedure that the office obtained an informed consent: RSW will email your dental office a template of an informed consent for teeth whitening. Your office should customize this form and tailor it to your specific needs. In general, informed consent is more than simply getting a patient to sign a written consent form. It is a process of communication between a patient and dental team that results in the patient`s authorization or agreement to undergo a specific medical intervention. In the communications process, you, as the dental team providing or performing the treatment and/or procedure, should disclose and discuss with your patient:
The patient`s diagnosis;
The nature and purpose of a proposed treatment or procedure;
The risks and benefits of a proposed treatment or procedure;
Alternatives (regardless of their cost or the extent to which the treatment options are covered by health insurance);
The risks and benefits of the alternative treatment or procedure; and
The risks and benefits of not receiving or undergoing a treatment or procedure.
In turn, your patient should have an opportunity to ask questions to elicit a better understanding of the treatment or procedure, so that he or she can make an informed decision to proceed or to refuse.
SHADE GUIDE
The office should document the initial shade score. The initial shade score can help the office, manage patients expectations for initial results, and need for follow up appointments; for more information on this subject please consult your rsw representative or see our section on important whitening facts in this web site.
POLISHING THE TEETH BEFORE WHITENING
The initial pedicle layer and extrinsic stains should be removed with polishing before the whitening process with gels begins. Do not use pumice because this is not an effective polishing agent. Please use a medium or courser grade polishing paste, fluoride in the paste will not effect the whitening process.
Typically good polishing requires adequate polishing paste and about 5 seconds per area on the tooth where you are polishing; resist the temptation to continuously move the polishing head; it is already spinning; you need to let the paste/gel have a chance to work at that specific location. Please don’t forget to polish both the front and back of the anterior teeth.
GINGIVAL BARRIER PLACEMENT
This is the final preparatory procedure before delivery of the gel and tray to the patient. The gingival barrier is placed while a mouth retraction is in position. A cool-dam should be used in combination with a curing light or a cool whitening light.


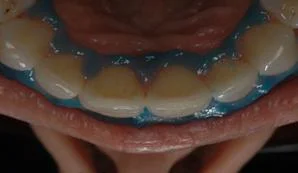
GEL PLACEMENT
After the gingival barrier is placed paint on the in-office professional whitening gel on the patient`s teeth. This 3 cc syringe has enough gel to perform 3 in-office dental whitenings on your patient. Remember that older patients and patients with gray tones will need multiple appointments, see recommendation on appointments below. Please use the gel on the buccal and the lingual surfaces.
Additional gel should be added during the appointment if quantities of the gel is lost. This will require that the office staff member performing the whitening check on the patient and add, but not change out, solution as time goes on. Generally every thirty minutes the patient should be check and additional gel added if needed then initiate that gel with more light.
IN-OFFICE LIGHT

Now you are ready to place the glasses on the patient and position the whitening light; Your assistant at this time is free to leave the operatory as long as the patient has adequate suction and means of contacting the staff if they need something. If you do not have a whitening light in your office, use a curing light for 5 minutes to activate the whitening gel.
TIMING OF WHITENING 1 HOUR
The ideal whitening process should be 90 minutes. Usually there is a need to add additional whitening gel at the 1 hour mark due to washout of the gel from the tray. The gingival barrier should not be dislodged from its position if adequate space for the barrier was created during the tray preparation phase.
POST POLISH WITH MI PASTE
Post whitening polishing allows a luster to be placed on the teeth as well as a protective properties that will aide in maintaining results and avoidance of re-staining. Use a technique similar to the initial polishing technique or simply have the patient brush on the paste and keep in the mouth for 1 minute or longer.

SHADE GUIDE
The final phase of treatment will be to record the obtained results and to verify if additional take-home or in-office procedures will be necessary.
MAKING TAKE-HOME TRAYS
Your take home kit will have vacuum-form trays to make in-office custom trays.
Because our system has a high concentration of whitening solution our take-home system include vitamin E to manage unintentional gingival exposure to the whitening gel.
Use of our tray system will necessitate the office helping the bite with the first impression. So perform this in-office before the patient leaves the office. Also be sure to show the patients the upper and lower side of the dual arch tray.
